UPDATE – 3/30/2022: another 8.1.x update to automatically populate the CA trusted fingerprint and the Advanced YAML settings to add the generated ca.crt onto fleet for easier use – Please go to the bottom of the article for an explaination
UPDATE: 8.1.0 release introduced some changes where the default policies are no longer created on default and you will need to manually create it. I will add the steps to the end of the document
Fleet server in docker container
Fleet & Fleet server was released as of 7.14.0 and it uses the elastic-agent as a single, unified way to add monitoring for logs, metrics and other types of data.
Fleet server is the mechanism to connect elastic-agents to fleet.
Basically a Fleet server is an elastic-agent running in a server mode so that other elastic-agents can connect to it and be managed by the fleet server to send data into elasticsearch
In this article I will assume that you are using a self-signed certificate which complicate things but if you are using a public’y trusted signed certificate you can leave out all the certificate items from the configurations.
Prepare elasticsearch and kibana for fleet
If you’ve never browsed to the FLEET app in kibana and/or if this is a fresh install you will need to prepare your elasticsearch and kibana for fleet.
- make sure you have
xpack.security.authc.api_key.enabled: truein your elasticsearch.yml. If you are just now adding it please restart your elasticsearch cluster to take effect - Either browse to the FLEET application on kibana or run the following curl call, this will get elasticsearch and kibana prepared for fleet.
curl -k -u "elastic:<password>" -XPOST https://kibana-url:5601/api/fleet/setup --header 'kbn-xsrf: true' - Create a service token to enroll your Fleet server. Service tokens are different than enrollment tokens. enrollment tokens are used to enroll elastic-agents. Service token is used to enroll Fleet Servers.
curl -k -u "elastic:<password>" -s -X POST https://kibana-url:5601/api/fleet/service-tokens --header 'kbn-xsrf: true' | jq -r .valueYou can enroll Fleet servers via service token or username/passwords
- Run your container
docker run \
--env FLEET_SERVER_ENABLE=true \
--env FLEET_SERVER_ELASTICSEARCH_HOST=https://<elasticsearch HTTP endpoint>:9200 \
--env FLEET_SERVER_ELASTICSEARCH_CA=/path/to/your/ca.crt
--env FLEET_SERVER_SERVICE_TOKEN=<service-token>
--env FLEET_URL=https://<fleet-url>:8220 \
--env FLEET_CA=/path/to/your/ca.crt \
--env FLEET_SERVER_CERT=/path/to/your/fleet.crt \
--env FLEET_SERVER_CERT_KEY=/path/to/your/fleet.key \
--env CERTIFICATE_AUTHORITIES=/path/to/your/ca.crt \
# if you are using a service token then
--env FLEET_SERVER_SERVICE_TOKEN=<service token> \
# if you are using a username/password instead of the service token
--env FLEET_SERVER_ELASTICSEARCH_USERNAME=elastic \
--env FLEET_SERVER_ELASTICSEARCH_PASSWORD=<password> \
--env ELASTICSEARCH_HOST=https://<elasticsearch-endpoint>:9200 \
--env ELASTICSEARCH_CA=/path/to/your/ca.crt
--env ELASTICSEARCH_USERNAME=elastic \
--env ELASTICSEARCH_PASSWORD=<password> \
--env KIBANA_FLEET_SETUP=1 \
--env KIBANA_HOST=https://<kibana-endpoint>:5601 \
--env KIBANA_CA=/path/to/your/ca.crt \
--env KIBANA_USERNAME=elastic \
--env KIBANA_PASSWORD=<password> \
#
--rm docker.elastic.co/beats/elastic-agent:<version>
Once the agent is registered you can restart your fleet server container.
Configuring FLEET to register elastic-agents
Browse to the Fleet application and click on Fleet settings on the top right corner. Update the Fleet Server Hosts to your containers external access point. Also update your Elasticsearch host to how your agents will access elasticsearch. Please make sure to specify https for both hosts.
Now we need to add our certificate_authorities. You can copy out your ca.crt onto each of the elastic-agents endpoints but I found it easier to just put the contents of the ca.crt into this field.
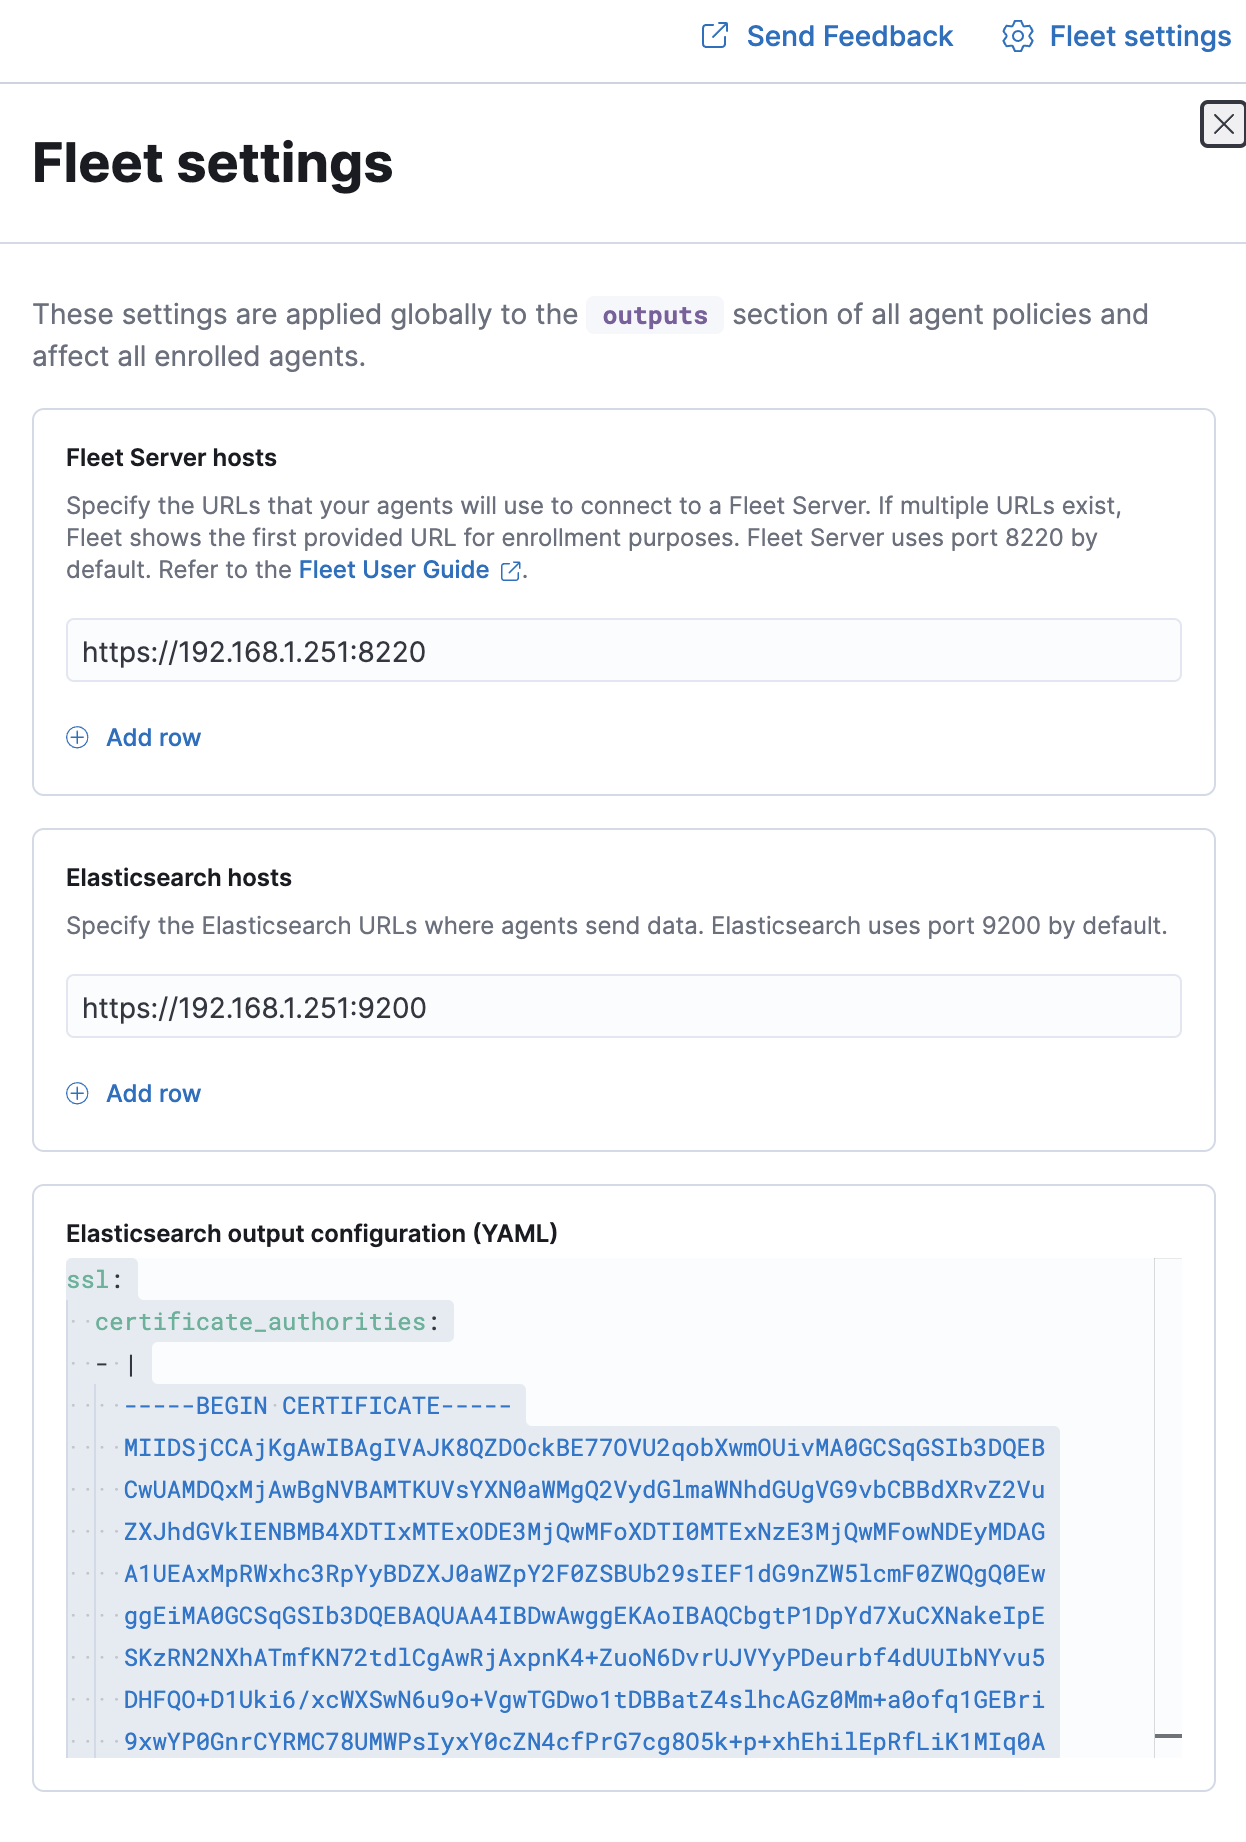
Save and apply settings.
Now lets register a remote agent.
(To register an agent its best to have a copy of the ca.crt locally just for the registeration purpose. I put mine in /tmp/ca.crt)
First goto Fleet -> Enrollment tokens an copy the token for the Default policy or any other policy you want to register your agent against.
$ sudo elastic-agent enroll -f --url=https://192.168.1.251:8220 --enrollment-token=MFFJVk5IMEJZSk4tSHdMdTNrUXU6cTFTTHlQQjNRUE9RTGx0aFRiUC0xQQ== -a /tmp/ca.crt
2021-11-18T14:42:45.849-0600 INFO cmd/enroll_cmd.go:396 Starting enrollment to URL: https://192.168.1.251:8220/
2021-11-18T14:42:46.678-0600 INFO cmd/enroll_cmd.go:232 Elastic Agent might not be running; unable to trigger restart
2021-11-18T14:42:46.678-0600 INFO cmd/enroll_cmd.go:234 Successfully triggered restart on running Elastic Agent.
Successfully enrolled the Elastic Agent.
# sudo systemctl start elastic-agent
$ sudo elastic-agent status
Status: HEALTHY
Message: (no message)
Applications:
* filebeat (HEALTHY)
Running
* filebeat (HEALTHY)
Running
* metricbeat (HEALTHY)
Running
* metricbeat (HEALTHY)
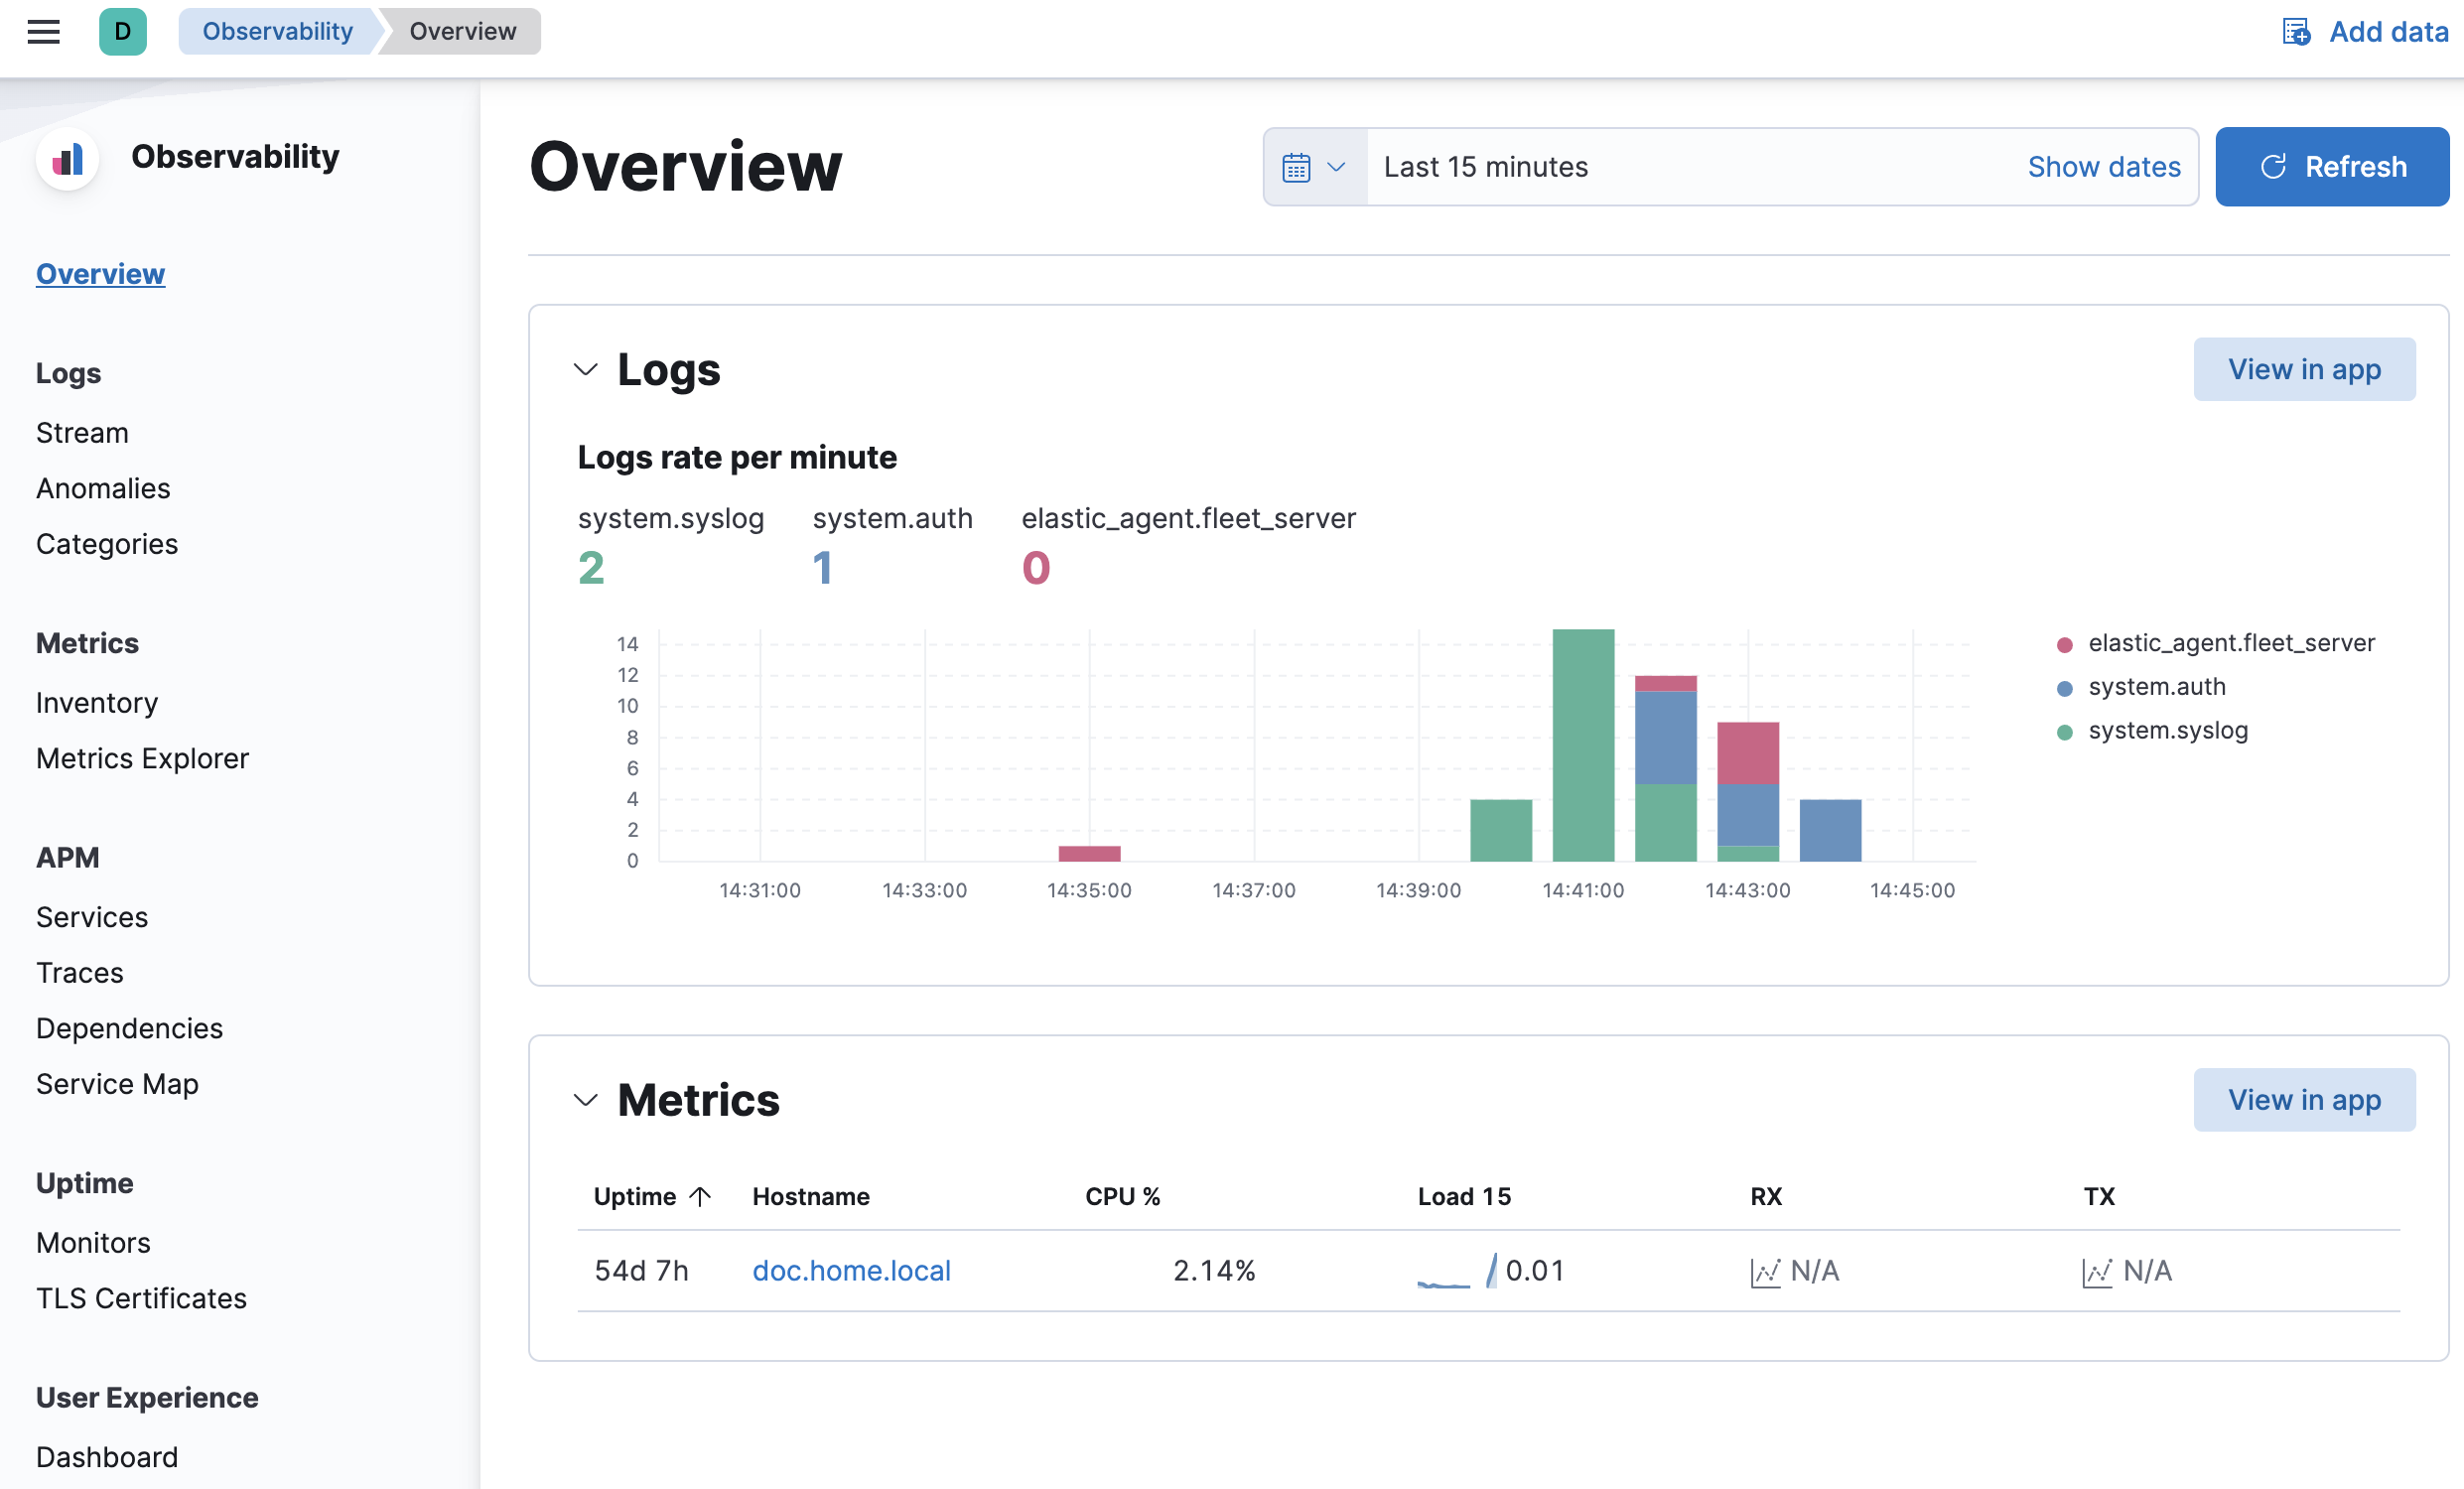
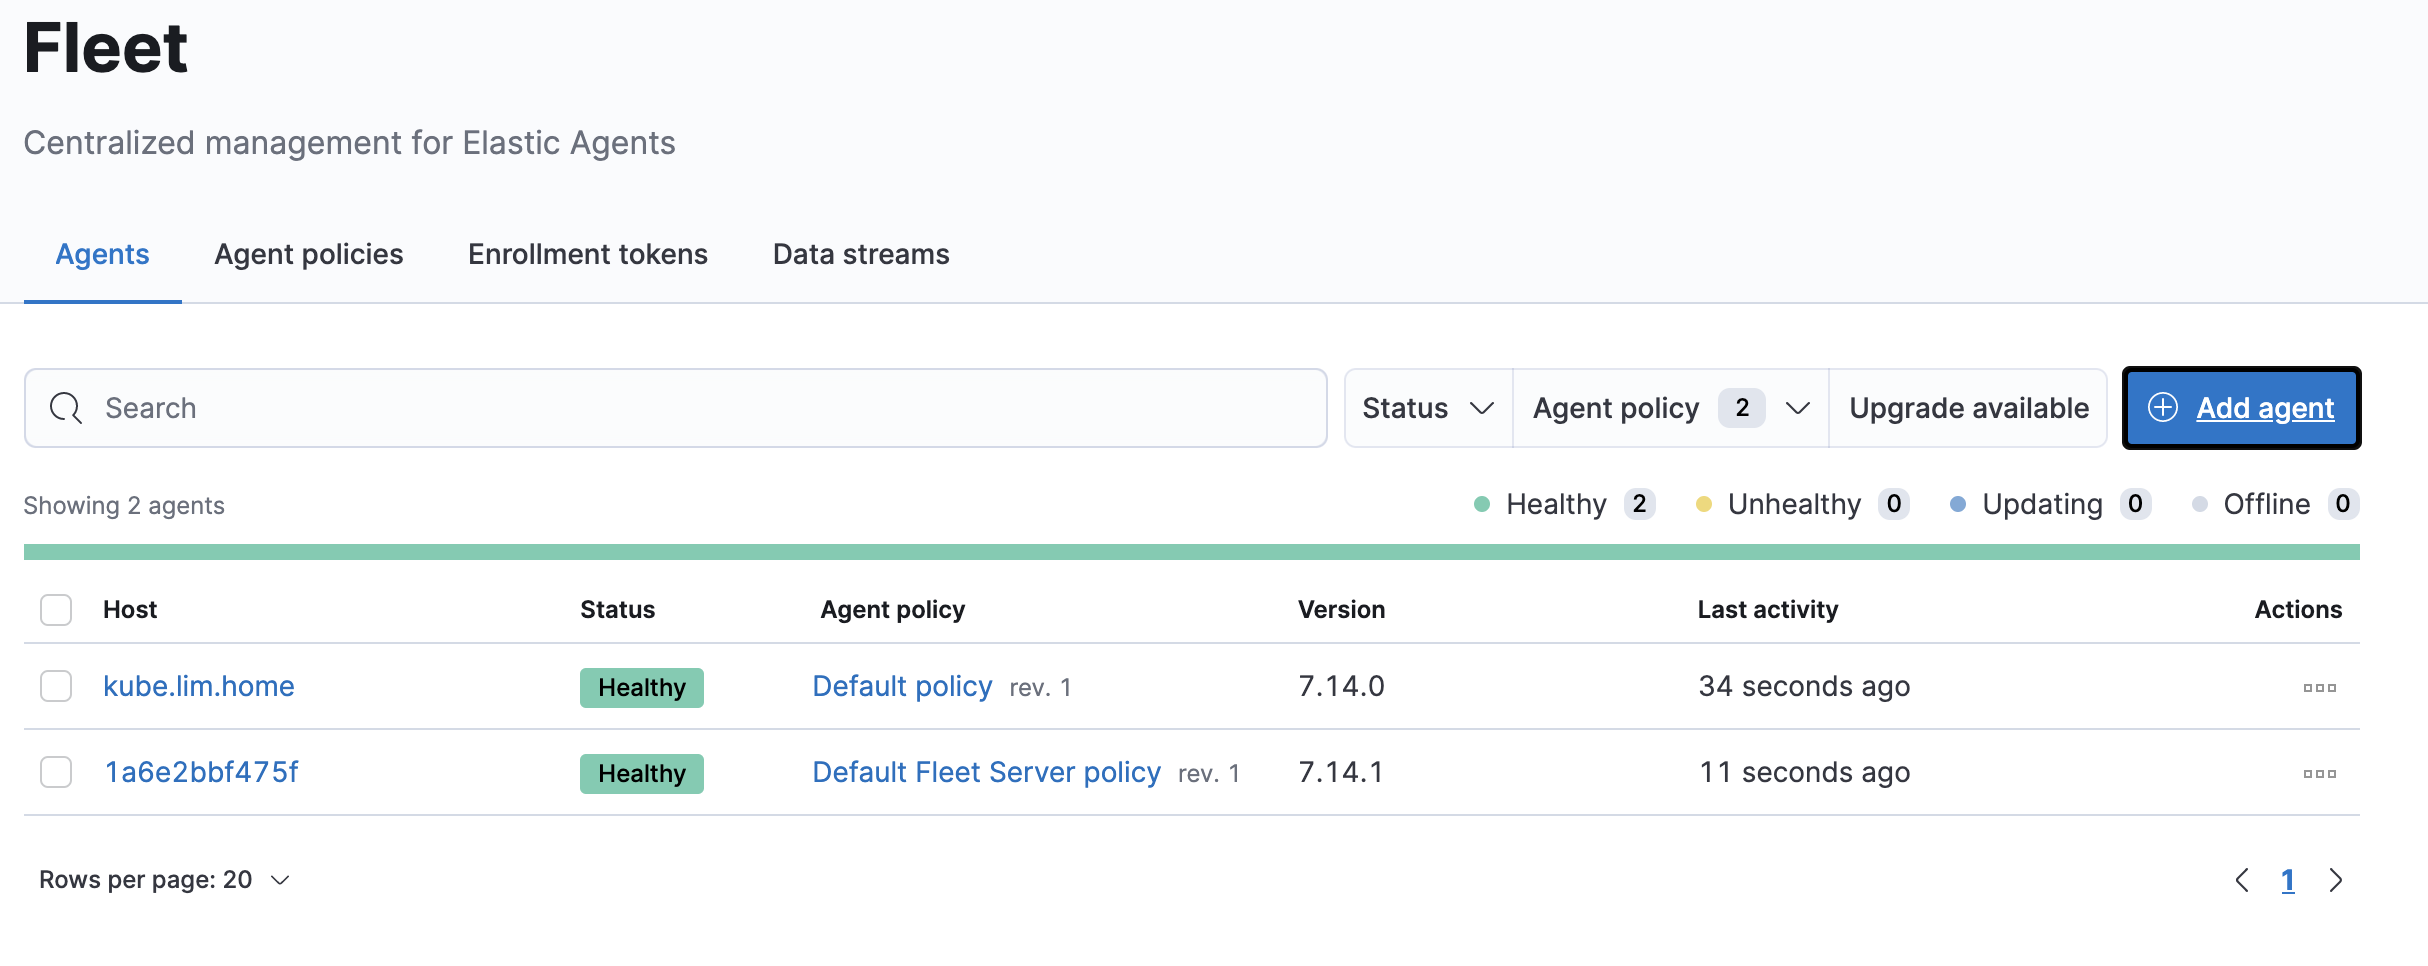
RunningNow we see that our agent is registered
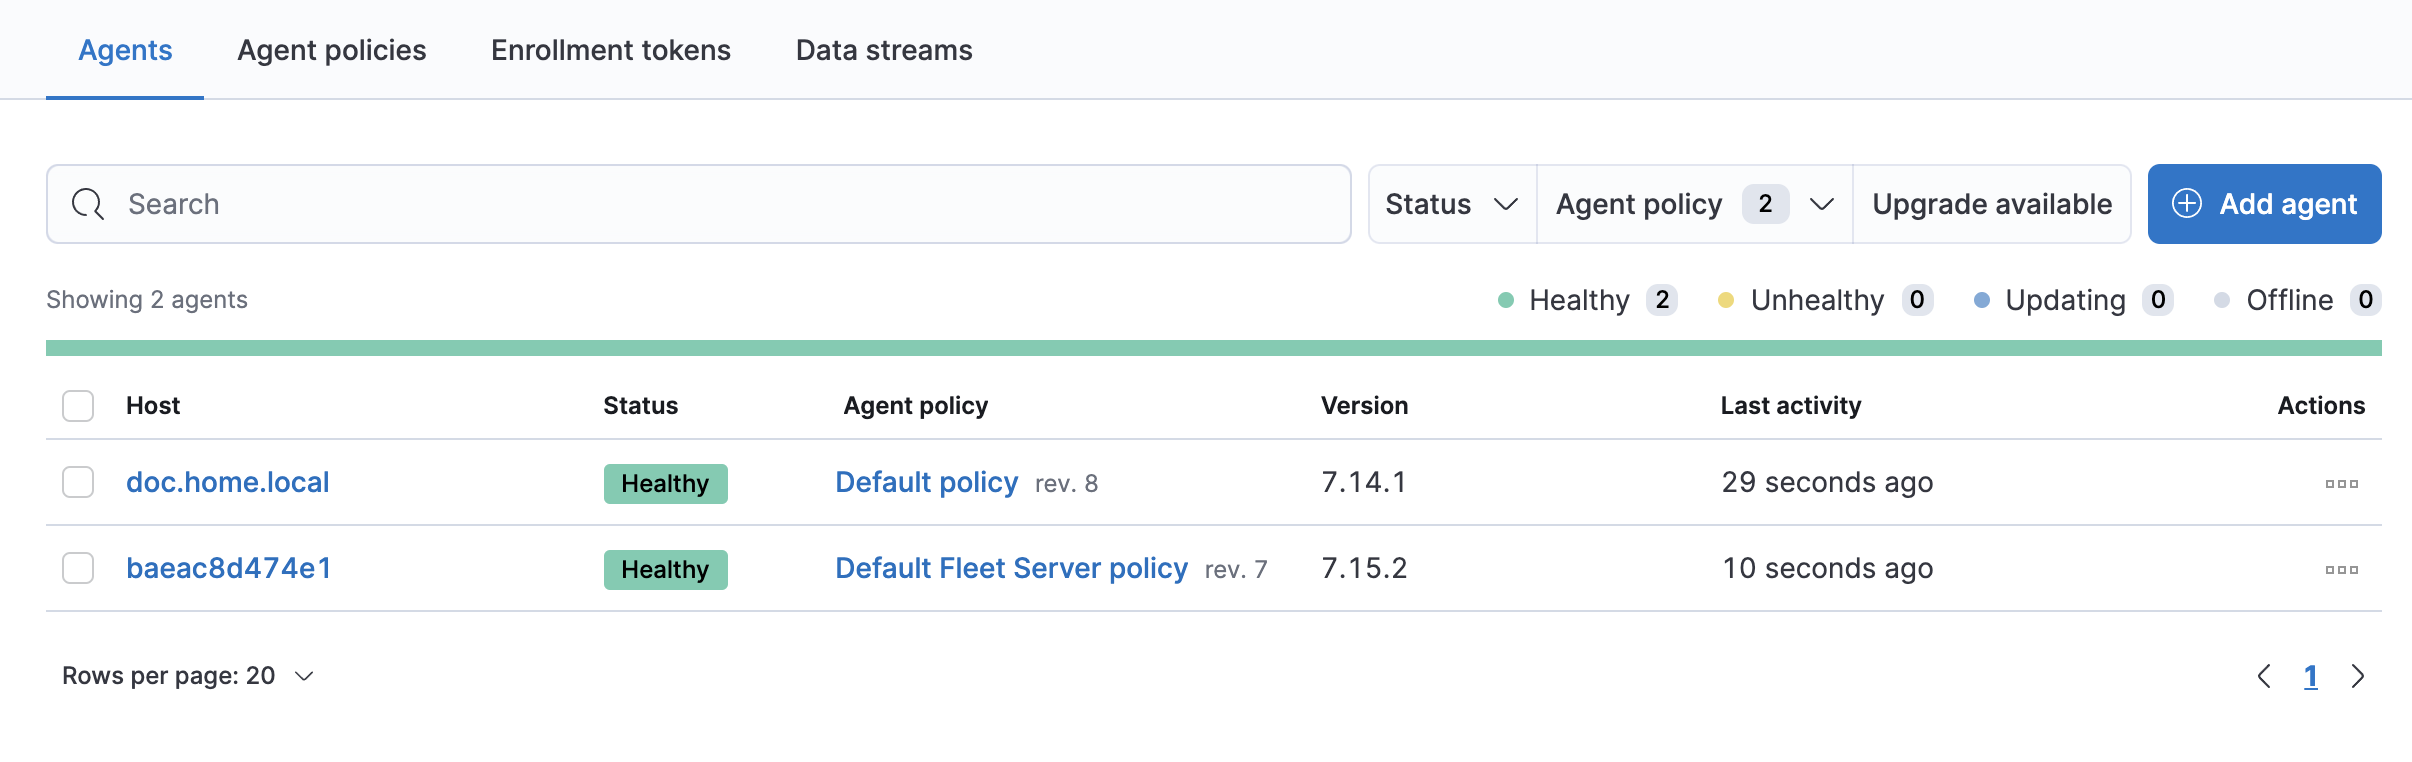
Also we see that the data is flowing
Fleet server in docker container using my deploy-elastic.sh script
Previously, on this post I’ve created a script to deploy the elastic stack using docker containers.
In the new version of the deploy-elastic.sh script I’ve added the fleet mode so that you can deploy the Fleet server and use it to register elastic-agents.
Simple run ./deploy-elastic.sh fleet 7.14.1
- The script will check to see if your stack is 7.14+ or else it will exit.
- Fleet server will be stood up using a container named fleet
- The fleet server will listen on port 8220 (standard port) – when you are registering remote agents use your host’s IP address and 8220 to register the agents.
- Fleet endpoint is terminated wtih SSL and it uses the same ca.crt for your stack which is conviently copied out to your homedir/elasticstack/ca.crt so that you can copy it out to remote endpoints and use it to send data into fleet server.
- Even if you’ve deployed the stack using other options you can add fleet onto it by running
./deploy-elastic.sh fleet {version}just make sure that the version matches your current deployment and that it is 7.14+
Once you are done testing again the cleanup is super simple just run ./deploy-elastic.sh cleanup and it will cleanup all the volumes/containers/networks. It will not remove the images so you will need to do that manually
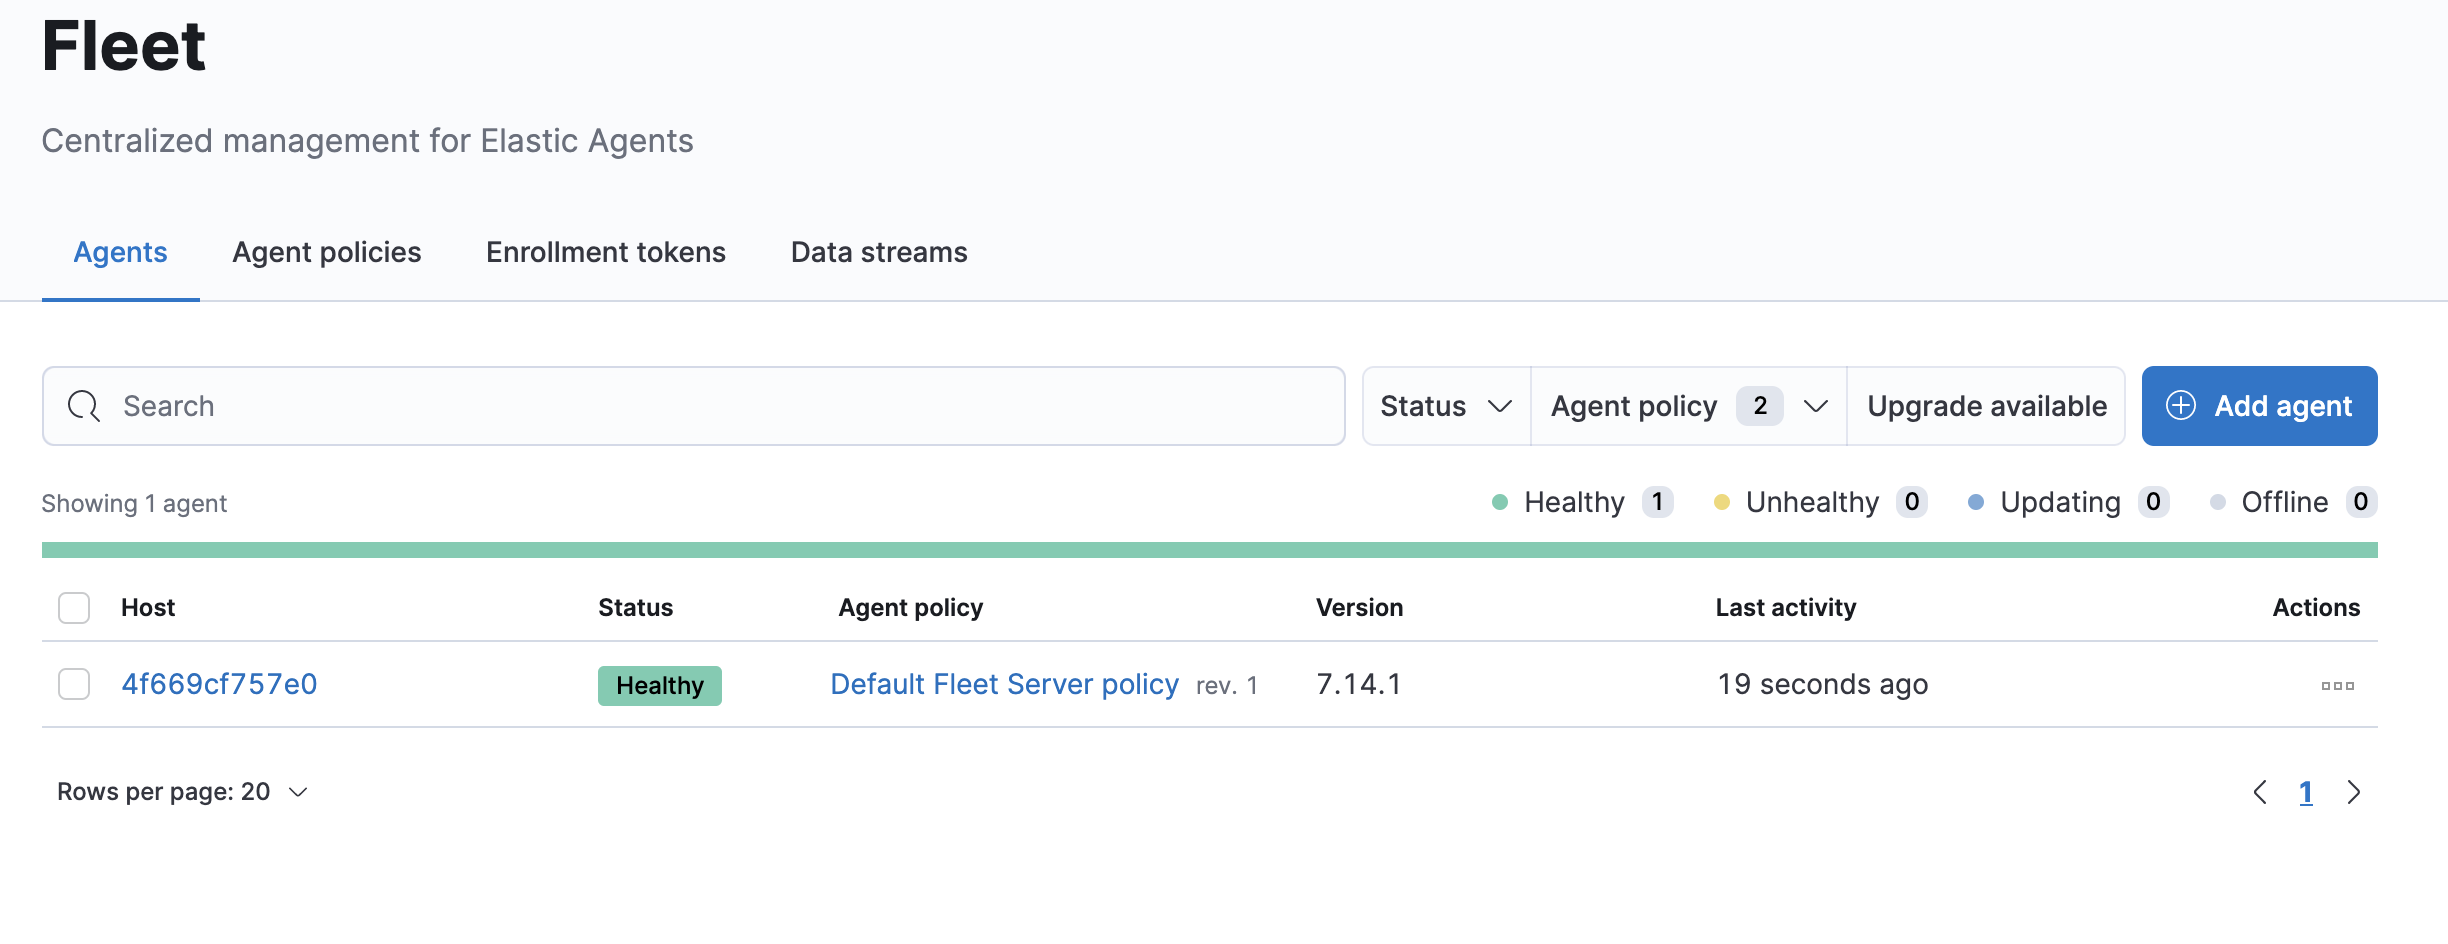
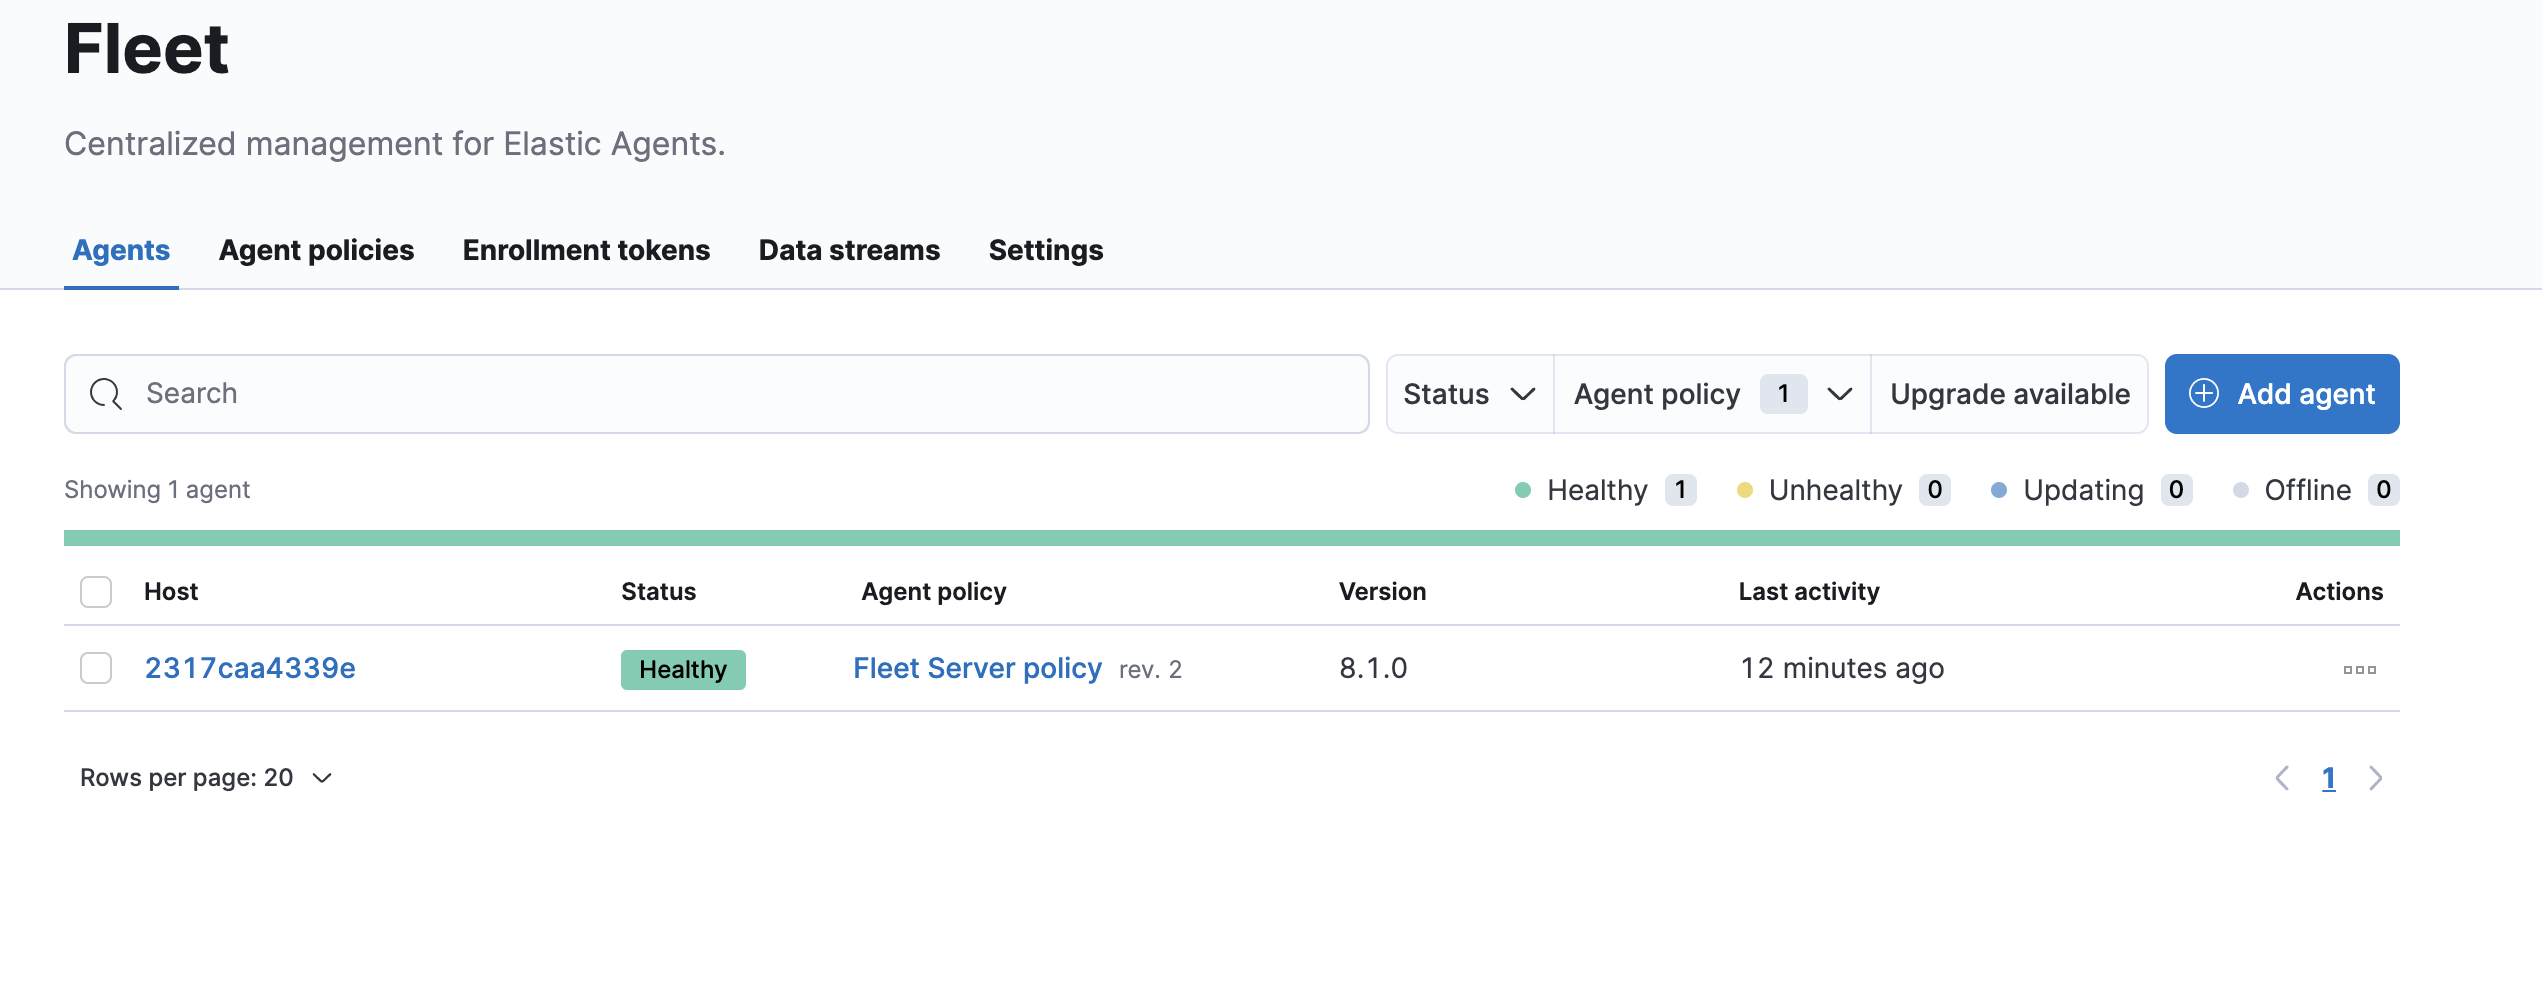
After the stack is deployed you can log into kibana -> Management -> Fleet and view your Fleet server
Enroll elastic agents onto my deployment
My host that runs the newly deployed elastic stack has IP of 192.168.1.172. As mentioned earlier if you goto your homedirectory/elasticstack it has a copy of the ca.crt that was used to sign all the certificate. You will need to copy this ca.crt to the host that you will install and run the elastic-agent from.
I have a 2nd linux host named kube that will run the elastic-agent and report back to my deployment. I’ve rpm installed the elastic-agent using yum onto this host and copied the ca.crt to /etc/elastic-agent/ and chowned it root:root
Enroll the agent:
# elastic-agent enroll -f -a /etc/elastic-agent/ca.crt --fleet-server-es-ca /etc/elastic-agent/ca.crt --url=https://192.168.1.172:8220 --enrollment-token=Tms1d3gzc0JlaGt4b2VJOURsLVk6R3VIUHg2ODZTNDY0WXIybmhCM3pYZw==

2021-09-08T20:48:31.597-0500    INFO    cmd/enroll_cmd.go:414   Starting enrollment to URL: https://192.168.1.172:8220/
2021-09-08T20:48:32.404-0500    INFO    cmd/enroll_cmd.go:250   Elastic Agent might not be running; unable to trigger restart
2021-09-08T20:48:32.404-0500    INFO    cmd/enroll_cmd.go:252   Successfully triggered restart on running Elastic Agent.
Successfully enrolled the Elastic Agent.
Where did I get the enrollment token? From the Enrollment tokens tab in Fleet.
Start the agent:
# systemctl start elastic-agent
# ps -ef | grep elastic
root      898478       1 35 20:48 ?        00:00:01 /usr/share/elastic-agent/bin/elastic-agent --path.home /var/lib/elastic-agent --path.config /etc/elastic-agent --path.logs /var/log/elastic-agent run --environment systemd -c /etc/elastic-agent/elastic-agent.yml
root      898512  897241  0 20:48 pts/0    00:00:00 grep --color=auto elastic
Now I go back to my Fleet -> Agents page and now I can see that the agent is reporting in
The following is the output from a clean deployment.
❯ time ./deploy-elastic.sh fleet 7.14.1
[DEBUG] Deployment does not exist.  Starting deployment first
********** Deploying elasticsearch & kibana 7.14.1 **********
[DEBUG] docker.elastic.co/elasticsearch/elasticsearch:7.14.1 docker image already exists.. moving forward..
[DEBUG] docker.elastic.co/kibana/kibana:7.14.1 docker image already exists.. moving forward..
[DEBUG] Created elasticsearch.yml
[DEBUG] Setting temp password for elastic as G3q1l7lIFdnHK315AxDuWTlzJ
[DEBUG] Created kibana.yml
[DEBUG] Created .env file
[DEBUG] Created instances.yml
[DEBUG] Created create-certs.yml for 7.14.1
[DEBUG] Created stack-compose.yml for 7.14.1
[DEBUG] Create certificates
Creating network "es_default" with the default driver
Creating volume "es_certs" with default driver
Creating es_create_certs_run ... done
Archive:  /certs/bundle.zip
   creating: /certs/ca/
  inflating: /certs/ca/ca.crt
   creating: /certs/es01/
  inflating: /certs/es01/es01.crt
  inflating: /certs/es01/es01.key
   creating: /certs/es02/
  inflating: /certs/es02/es02.crt
  inflating: /certs/es02/es02.key
   creating: /certs/es03/
  inflating: /certs/es03/es03.crt
  inflating: /certs/es03/es03.key
   creating: /certs/kibana/
  inflating: /certs/kibana/kibana.crt
  inflating: /certs/kibana/kibana.key
   creating: /certs/apm/
  inflating: /certs/apm/apm.crt
  inflating: /certs/apm/apm.key
   creating: /certs/entsearch/
  inflating: /certs/entsearch/entsearch.crt
  inflating: /certs/entsearch/entsearch.key
   creating: /certs/minio/
  inflating: /certs/minio/minio.crt
  inflating: /certs/minio/minio.key
   creating: /certs/fleet/
  inflating: /certs/fleet/fleet.crt
  inflating: /certs/fleet/fleet.key
[DEBUG] Starting our deployment
Creating volume "es_data01" with default driver
Creating volume "es_data02" with default driver
Creating volume "es_data03" with default driver
Creating kibana ... done
Creating es01   ... done
Creating es02   ... done
Creating es03   ... done
Creating es_wait_until_ready_1 ... done
[DEBUG] elasticsearch health is GREEN moving forward.
[DEBUG] Setting passwords and storing it in /Users/jlim/elasticstack/notes
Changed password for user apm_system
PASSWORD apm_system = A9sLi96IY9zRd7iTbyzm

Changed password for user kibana_system
PASSWORD kibana_system = 9AGAxQIUeIuvoIAeKVov

Changed password for user kibana
PASSWORD kibana = 9AGAxQIUeIuvoIAeKVov

Changed password for user logstash_system
PASSWORD logstash_system = TB7tAdTtUmjHexJqwz20

Changed password for user beats_system
PASSWORD beats_system = QbUD4RWqXFYpshqSQ9G0

Changed password for user remote_monitoring_user
PASSWORD remote_monitoring_user = ckrsVfB8lOjIv3jM2soe

Changed password for user elastic
PASSWORD elastic = IovHb7fqVvRjsJA3MZsQ

[DEBUG] elastic user's password found IovHb7fqVvRjsJA3MZsQ
[DEBUG] kibana.yml re-generated with new password and encryption keys
[DEBUG] Restarted kibana to pick up the new elastic password
[DEBUG] Copied the certificate authority into /Users/jlim/elasticstack
[DEBUG] Complete! - stack deployed. 7.14.1

********** Deploying FLEET **********
[DEBUG] elastic user's password found IovHb7fqVvRjsJA3MZsQ
[DEBUG] elasticsearch health is GREEN moving forward.
[DEBUG] docker.elastic.co/beats/elastic-agent:7.14.1 docker image already exists.. moving forward..
[DEBUG] Restarting es01 for FLEET
[DEBUG] Restarting es02 for FLEET
[DEBUG] Restarting es03 for FLEET
[DEBUG] elasticsearch is unhealthy. Checking again in 2 seconds.. if this doesnt finish in ~ 30 seconds something is wrong ctrl-c please.
[DEBUG] elasticsearch is unhealthy. Checking again in 2 seconds.. if this doesnt finish in ~ 30 seconds something is wrong ctrl-c please.
[DEBUG] elasticsearch is unhealthy. Checking again in 2 seconds.. if this doesnt finish in ~ 30 seconds something is wrong ctrl-c please.
[DEBUG] elasticsearch is unhealthy. Checking again in 2 seconds.. if this doesnt finish in ~ 30 seconds something is wrong ctrl-c please.
[DEBUG] elasticsearch is unhealthy. Checking again in 2 seconds.. if this doesnt finish in ~ 30 seconds something is wrong ctrl-c please.
[DEBUG] elasticsearch is unhealthy. Checking again in 2 seconds.. if this doesnt finish in ~ 30 seconds something is wrong ctrl-c please.
[DEBUG] elasticsearch is unhealthy. Checking again in 2 seconds.. if this doesnt finish in ~ 30 seconds something is wrong ctrl-c please.
[DEBUG] elasticsearch is unhealthy. Checking again in 2 seconds.. if this doesnt finish in ~ 30 seconds something is wrong ctrl-c please.
[DEBUG] elasticsearch health is GREEN moving forward.
[DEBUG] Created fleet-compose.yml
[DEBUG] Started FLEET SERVER. - Please give it about a minute for things to settle before you go into the FLEET app.
./deploy-elastic.sh fleet 7.14.1  6.58s user 2.46s system 9% cpu 1:37.36 total
UPDATE 8.1.0:
As mentioned on top with the introduction of 8.1.0 the default fleet server policy is no longer created by default and you need to create it before installing fleet, per https://www.elastic.co/guide/en/fleet/8.1/create-a-policy-no-ui.html
The changes for Prepare elasticsearch and kibana for fleet
- make sure you have
xpack.security.authc.api_key.enabled: truein your elasticsearch.yml - Prepare the FLEET application on kibana
curl -k -u "elastic:<password>" -XPOST https://kibana-url:5601/api/fleet/setup --header 'kbn-xsrf: true'- Create a Fleet Server Policy
curl -k -u "elastic:<password>" "https://kibana-url:5601/api/fleet/agent_policies?sys_monitoring=true" \
--header 'kbn-xsrf: true' \
--header 'Content-Type: application/json' \
--data-raw '{"id":"fleet-server-policy","name":"Fleet Server policy","description":"","namespace":"default","monitoring_enabled":["logs","metrics"],"has_fleet_server":true}'- Update Fleet Server URL. I’ve used localhost but please make sure to point it to what will be your Fleet endpoint
curl -k -u "elastic:<password>" -XPUT "https://kibana-url:5601/api/fleet/settings" \
--header 'kbn-xsrf: true' \
--header 'Content-Type: application/json' \
--data-raw '{"fleet_server_hosts":["https://localhost:8220","https://localhost:8220"]}'- Generate Service token
curl -k -u "elastic:<password>" -s -X POST https://kibana-url:5601/api/fleet/service-tokens --header 'kbn-xsrf: true' | jq -r .value- Run your container
docker run \
--env FLEET_SERVER_ENABLE=true \
--env FLEET_SERVER_ELASTICSEARCH_HOST=https://<elasticsearch HTTP endpoint>:9200 \
--env FLEET_SERVER_ELASTICSEARCH_CA=/path/to/your/ca.crt
--env FLEET_SERVER_SERVICE_TOKEN=<service-token>
--env FLEET_SERVER_POLICY=fleet-server-policy
--env FLEET_URL=https://<fleet-url>:8220 \
--env FLEET_CA=/path/to/your/ca.crt \
--env FLEET_SERVER_CERT=/path/to/your/fleet.crt \
--env FLEET_SERVER_CERT_KEY=/path/to/your/fleet.key \
--env CERTIFICATE_AUTHORITIES=/path/to/your/ca.crt \
# if you are using a service token then
--env FLEET_SERVER_SERVICE_TOKEN=<service token> \
# if you are using a username/password instead of the service token
--env FLEET_SERVER_ELASTICSEARCH_USERNAME=elastic \
--env FLEET_SERVER_ELASTICSEARCH_PASSWORD=<password> \
--env ELASTICSEARCH_HOST=https://<elasticsearch-endpoint>:9200 \
--env ELASTICSEARCH_CA=/path/to/your/ca.crt
--env ELASTICSEARCH_USERNAME=elastic \
--env ELASTICSEARCH_PASSWORD=<password> \
--env KIBANA_FLEET_SETUP=1 \
--env KIBANA_HOST=https://<kibana-endpoint>:5601 \
--env KIBANA_CA=/path/to/your/ca.crt \
--env KIBANA_USERNAME=elastic \
--env KIBANA_PASSWORD=<password> \
#
--rm docker.elastic.co/beats/elastic-agent:<version>
Please note that --env FLEET_SERVER_POLICY=fleet-server-policy was added. If you’ve named it differently in step 3 please adjust it.
This will bring your Fleet Server up and running
Also please note that the deploy-elastic.sh script was updated with this change as well.
- Enjoy!
UPDATE – 3/30/2022 I’ve found that there are some confusion for people that run fleet server on prem that has self signed certificates on how to configure SSL correctly.
There are multiple parts to FLEET.
- FLEET SERVER – this is your control plane. When you install the FLEET SERVER (it uses the same package/binary as elastic-agent) you specify the CA for your certificates thats used on your elasticsearch cluster as well as certificate you use for your FLEET SERVER. This setting however, does not configure your elastic-agents to use the same CA or certificates to communicate back to elasticsearch.
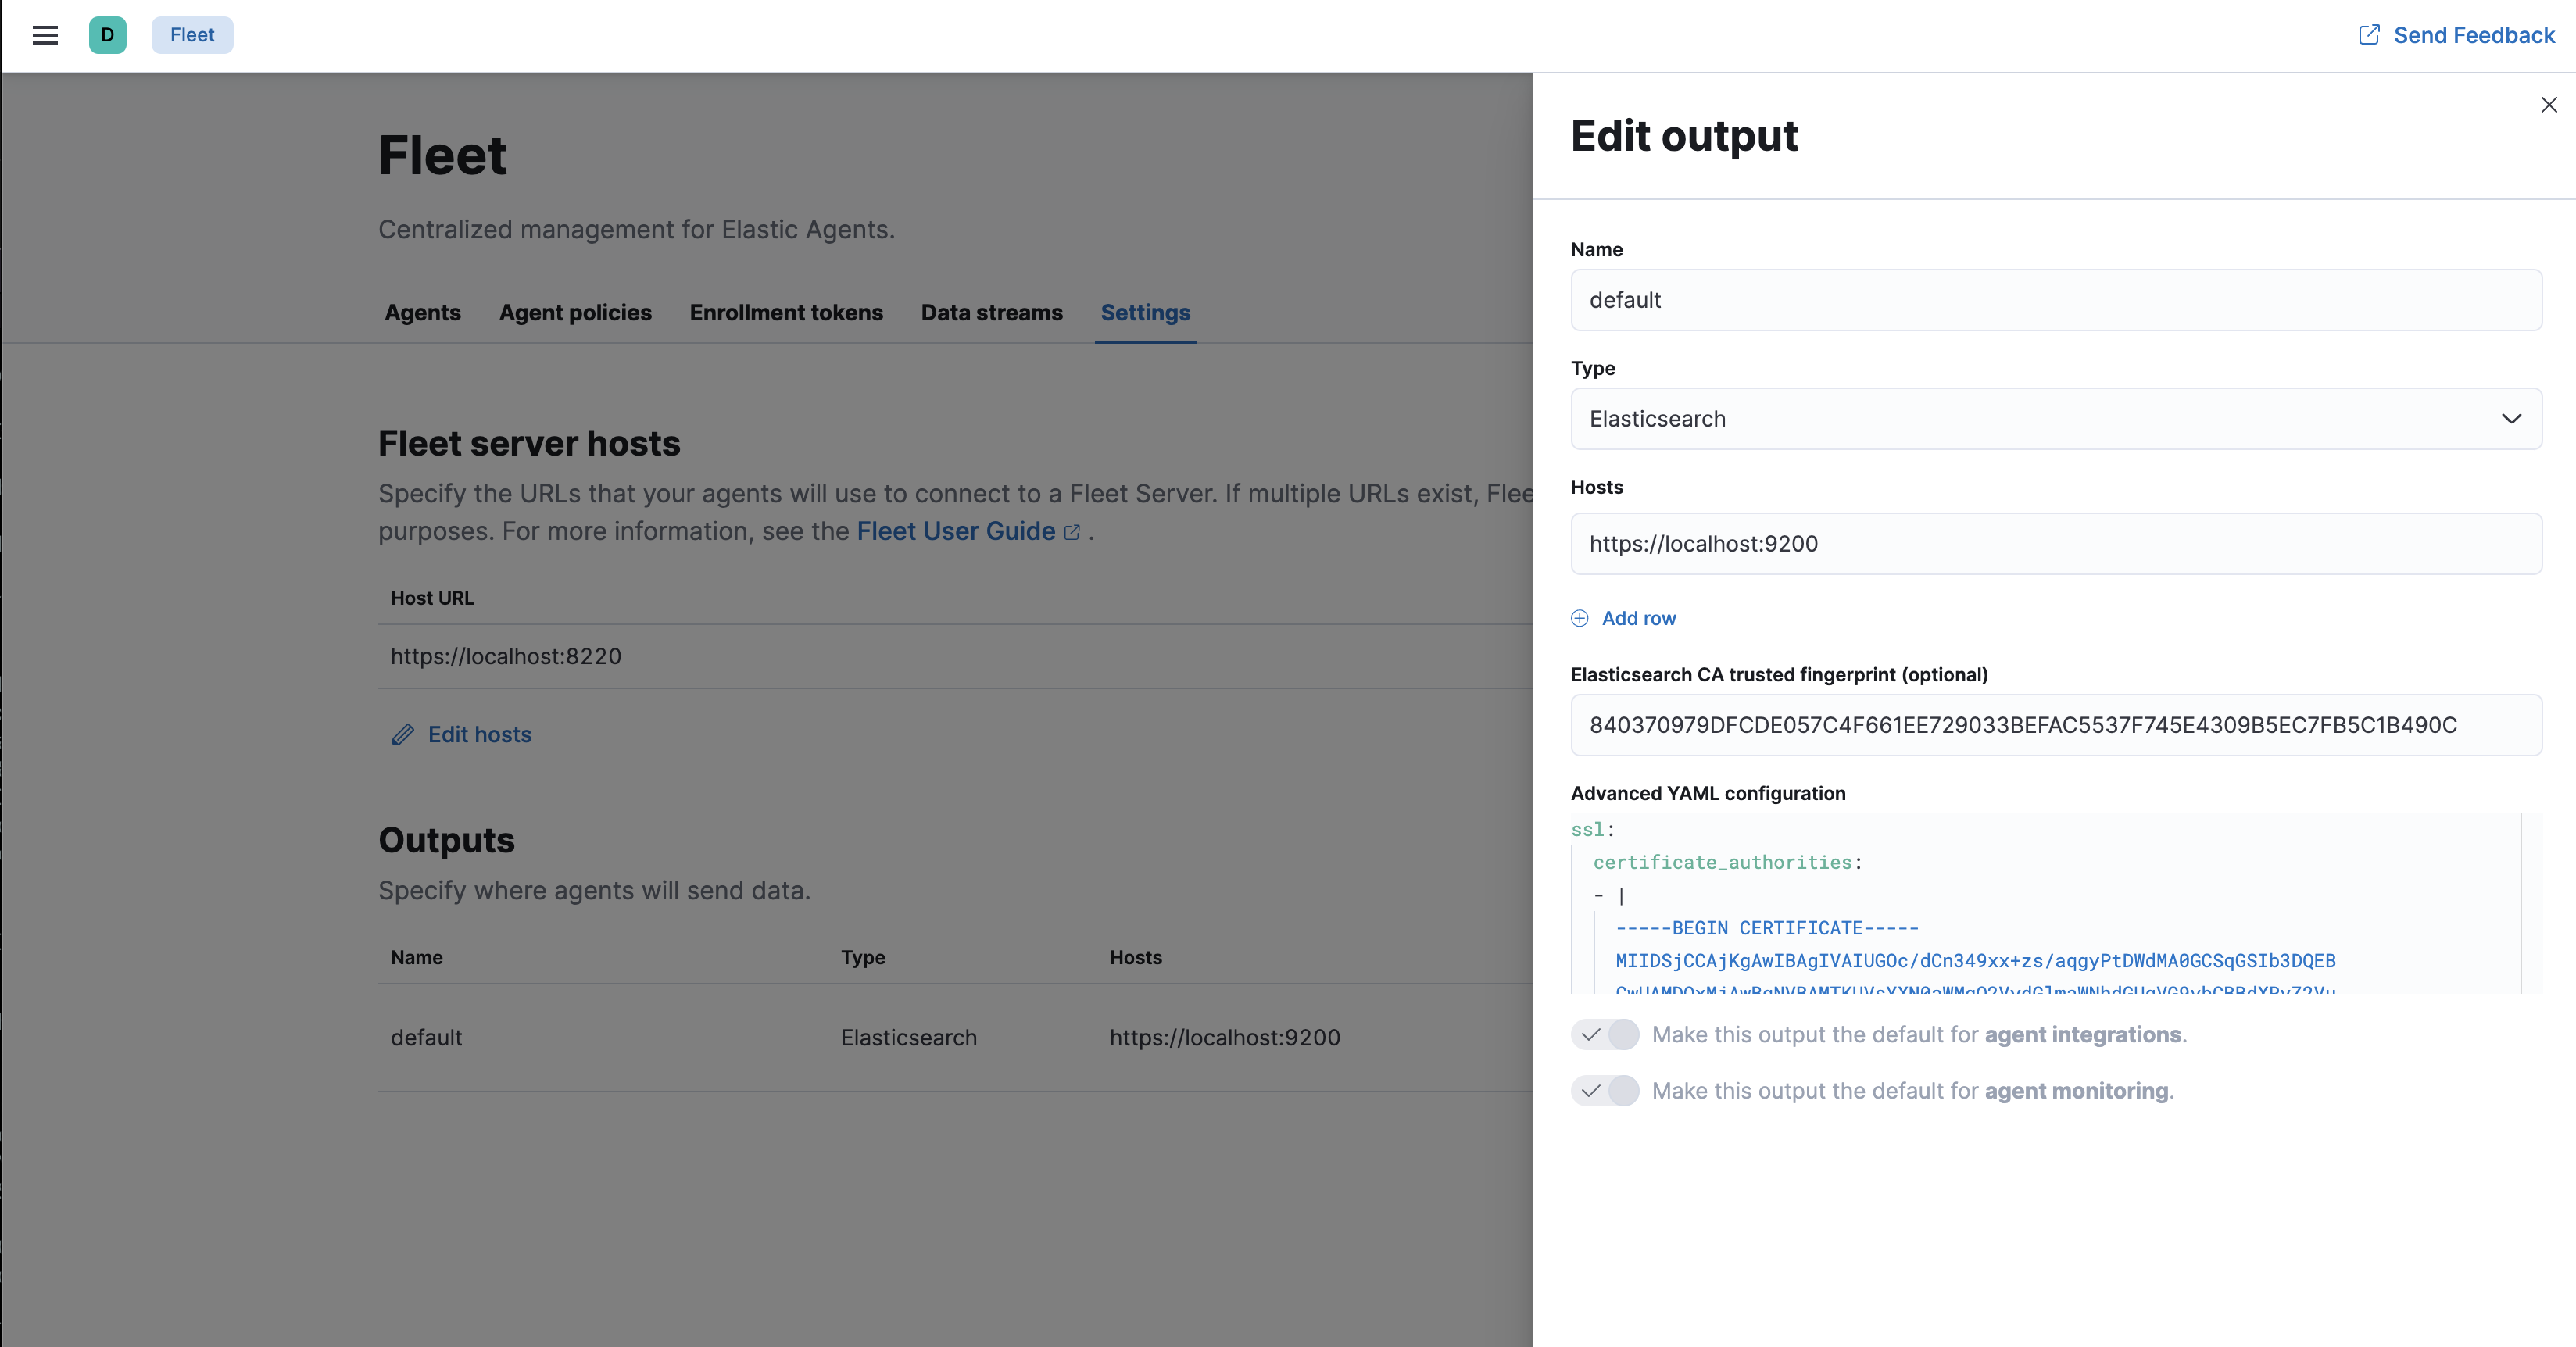
- elastic-agents – these are the elastic-agents acting as an agent that gets installed onto your landscape. When you install the elastic-agent, you can install this by packages or a tarball. After the elastic-agent is installed you will need to install/enroll the agent onto your FLEET application. BEFORE you try to enroll your agents you need to visit Settings, Kibana -> Fleet -> Settings and ensure that the
Fleet server hostsis configured correctly,Outputsis configured correctly with your elasticsearch endpoint. On top click on the Actions inOutputsand in theAdvanced YAML configurationthat yourssl.certificate_authoritiesis configured! This is the CA that elastic-agent will tell any other agents that it spins up to use to connect to elasticsearch, if you are self-signed and do not have this then you will get a x509 certificate unknown errors.
Once the Settings are configured correctly, you can move on to Create Agent policies, if you havn’t done so already, then move onto Agents then Add Agent and depending on if you are Enroll in Fleet or Run standalone it will give you the correct syntax that you will need to use to configure your elastic-agent.
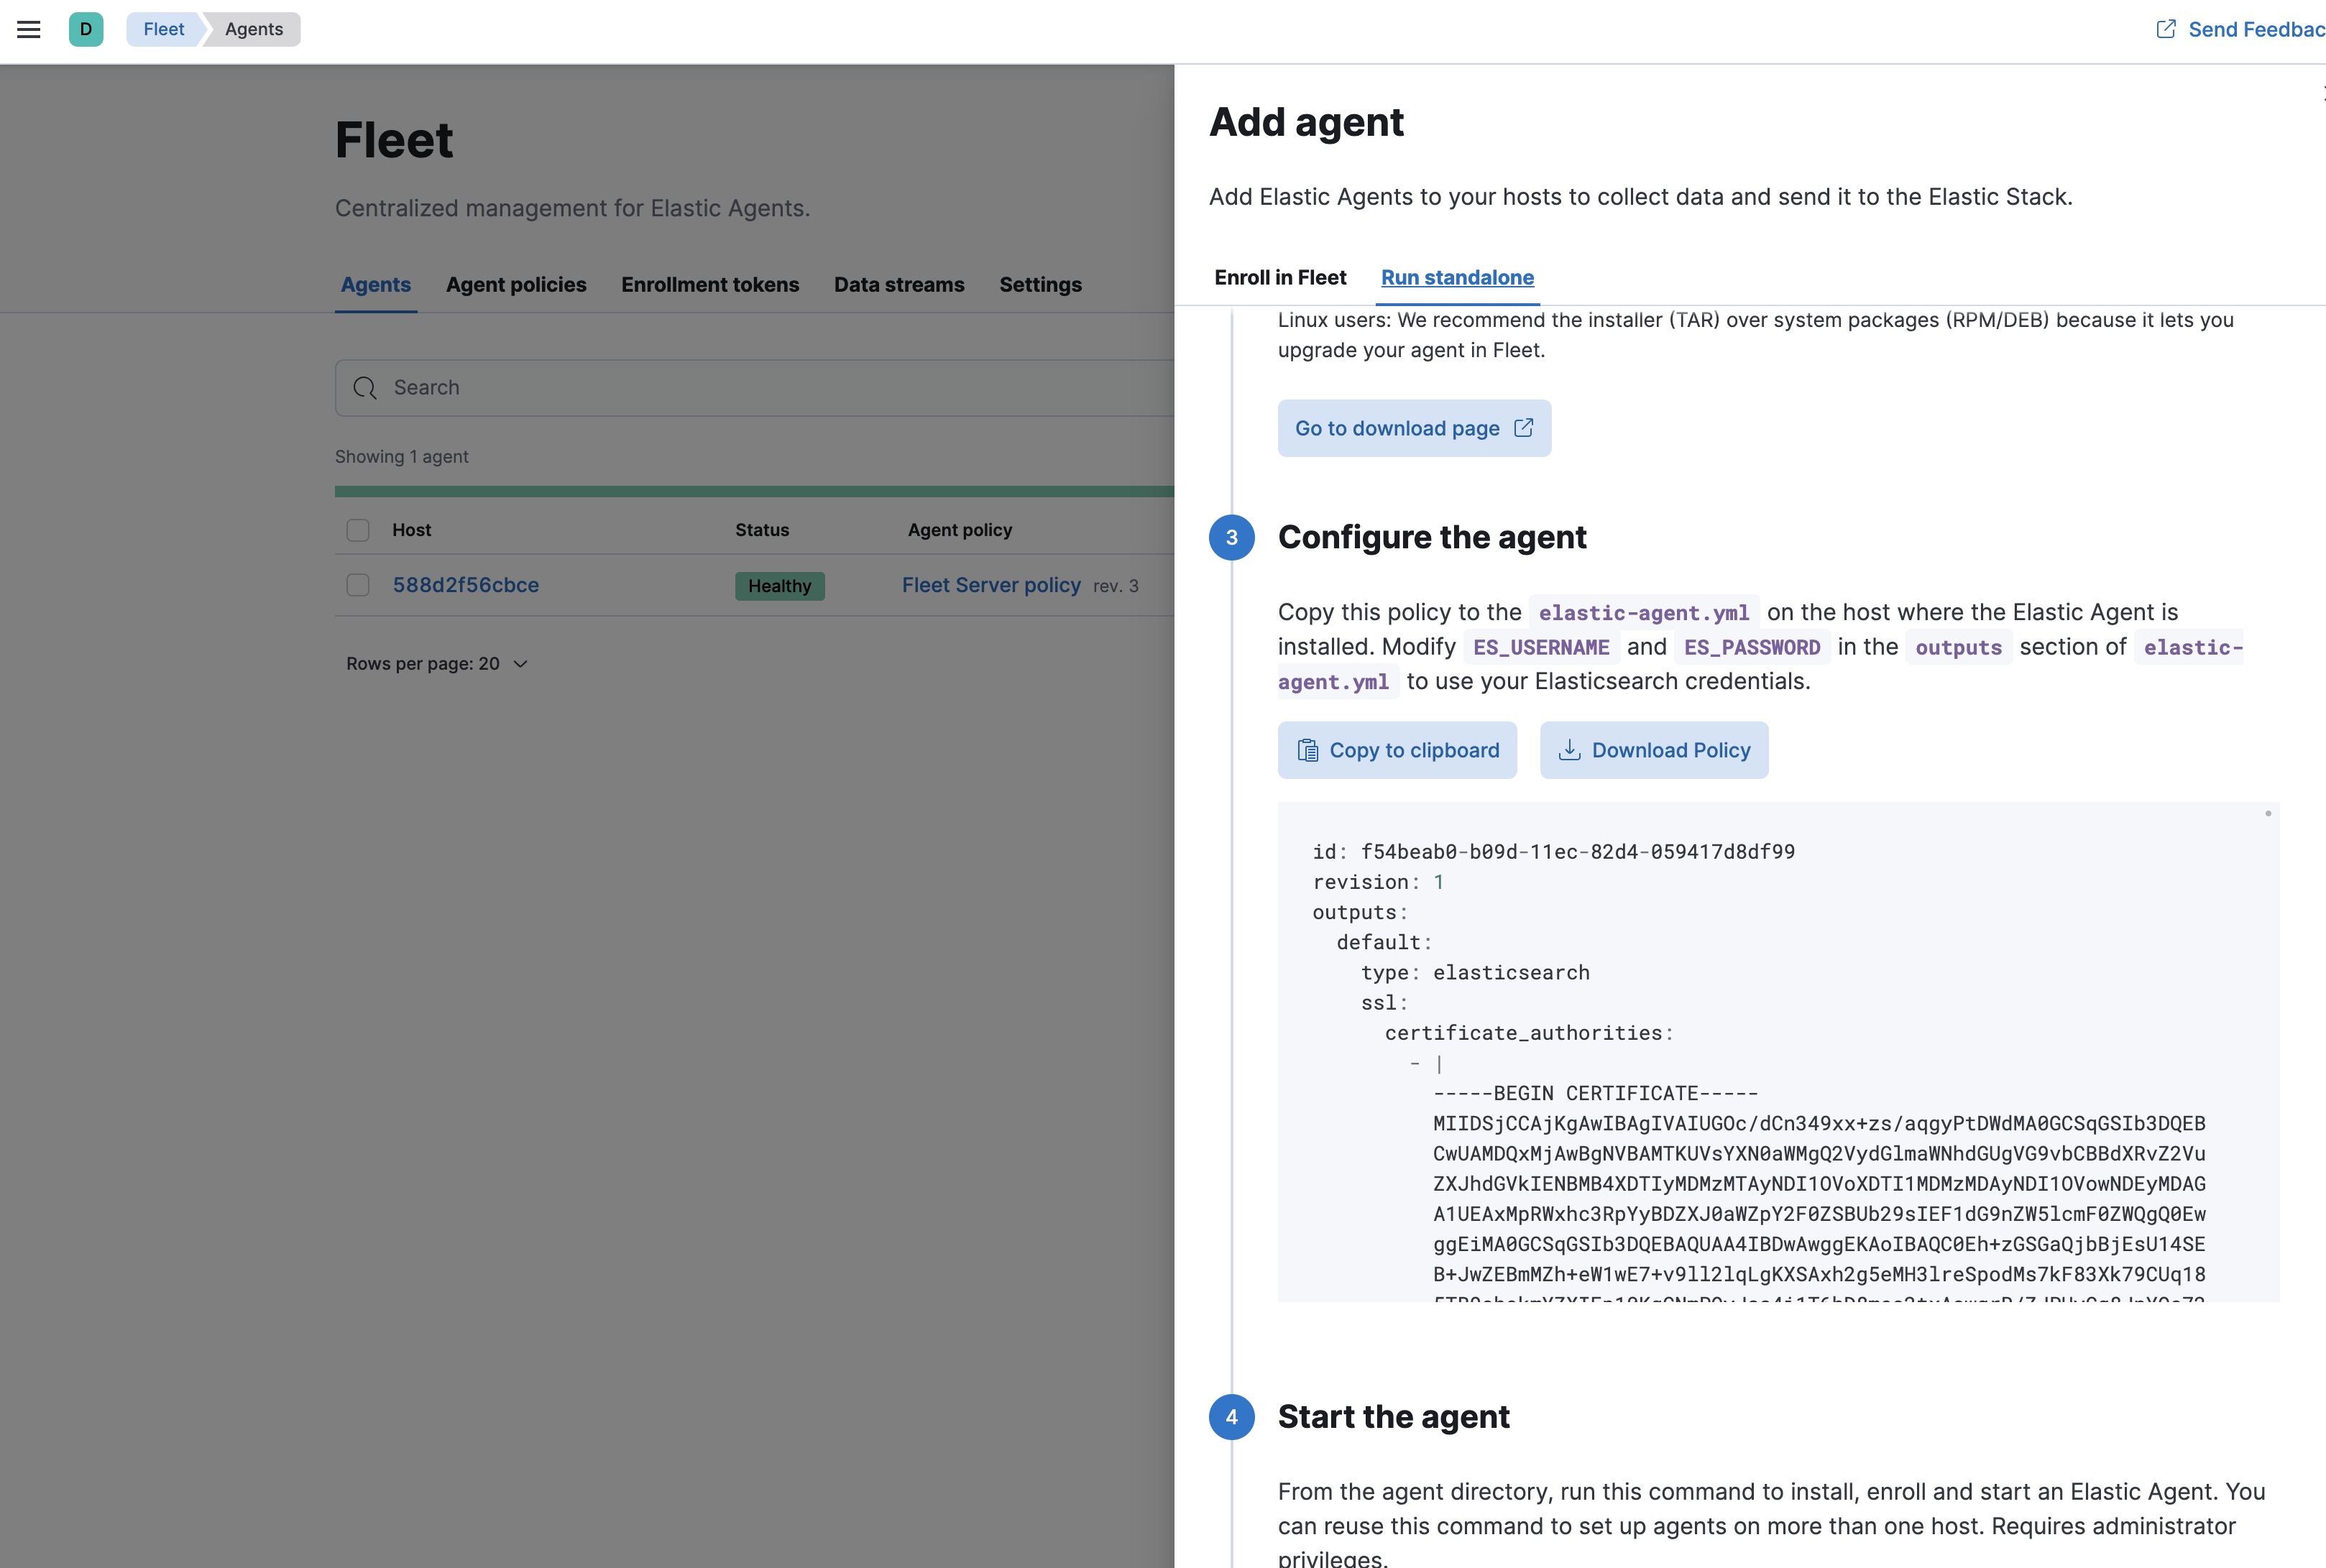
As you can see from the screenshot it will have your SSL configurations configured for you already to copy and paste into your elastic-agent.yml.
The deploy-elastic.sh script was updated on 3/30/2022 to include configuring the CA trusted Fingerprint and Advanced YAML configuration automatically using the ca.crt that the script generates, this should make things much easier since you no longer have to update this page in order to use Fleet server.
You might use `jq -r .value` instead of the string manipulation to acquire the token.
Daniel – very nice! sorry my jq foo isnt all that great! awesome suggestion! I will update it
This is wild! Thanks for this. I was looking for a compose file with Fleet Server.
great document thank you Justin. I am still learning from you. 😉
Bill – long time no see 🙂
I hope your doing well. Take care. Thanks for your guidance.
Hello,
I want to deploy the elastic agent in a container using docker-compose like outlined in https://www.elastic.co/guide/en/fleet/current/elastic-agent-container.html. However, I can’t seem to get it to work. The agent in the docker container seems to connect with fleet and elasticsearch just fine but I can’t access it (e.g. hitting http://localhost:8200 or even the processes endpoint at http://localhost:6791). Have you ever gotten a non-fleet elastic agent up and running using docker-compose?
Yes if you use my deploy script it actually creates a compose file for the fleet server inside of your ~/elasticstack directory named fleet-compose.yml which you can use as a template for yours
Hello Justin
Thank you! This was just what I needed to get my head around dockerising a fleet server + stack 🙂
Note for others who might hit this, for 8.7.0 if one has followed advice and also installed ‘docker compose’ (as opposed to docker-compose) your script needs a tweak to prevent it from checking for docker-compose presence, and to replace all the commands.
Kind Regards,
Damon
Hello, thank you for the article. I have my elastic stack environment all as containers. Is there a way to properly migrate my fleet server container without losing all my elastic agents that already checked in and apart of my fleet server?